Step 4: Installing the outlet

October 24, 2007

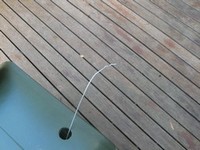
First photo: Here is the fitting (the part you see is the part that will be on the inside) of the wheeliebin, but how are we to get the plastic fitting into the wheelibin?

Second photo: One way might be lay the bin on its side and crawl in. Better still is the ‘fitting-on-a-wire’ technique. Feed a piece of wire through the fitting, bend the end as in the photo, and feed the wire from the inside of the bin to the outside through the hole.

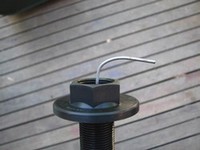
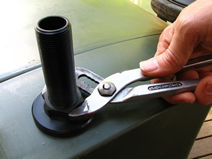
Third photo: Pull the fitting through from the outside, and fasten with a pair of large pliers or multigrips.

wire3.jpg  wire11.jpg
fasten the outlet

We’re getting close to the end off this stage. The tension and excitement build. I hope they last.

Note: I think you can use the same approach if you have to fit an outlet to a much larger tank. I did with our 1700L tank because the tank seller suggested to wait until the tank was in its final position before deciding where to put the outlet. His suggestion was spot on.


Step 3: Clean out the drill hole

October 23, 2007

Clean out the drill hole

This odd looking device that resembles a trunk of a tree is in fact a rasp, one uses to smooth the edges of the drill hole. It is a rough file. Step 4 (we can only dream) might be more exciting.

And here’s what were getting ready to fit.Exit fitting


Step 2: The power of small multiples — drilling the hole

October 22, 2007

drilling te hole the cheap way
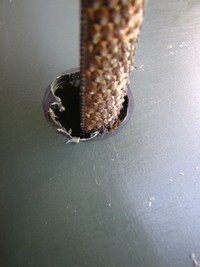
As I do not own one of those special tools for drilling really big holes, I drilled out the hole with a medium sized drill bit. (Here’s a good page describing how to use a ‘hole saw‘ which is the tool one should use for a job like this.)

That’s about it for this page. Just make sure you keep within the hole. If you want to be sure, drill some smaller guide holes first.


Step 1: Marking the bin for the outlet and hose connector

October 15, 2007

Tip: Work out where you want the bin to sit before you do this, otherwise you could end up cutting the hole on the wrong side of the bin. I make mistakes because I think I have visualised the job correctly. In this case I made certain by taking the bin to the place where it will sit.

step-one.jpg

  1. Mark the place where you want to cut the hole for the outlet. Use one of the washers that came with the fittings as your template, as the inside of one will be the exact size of the hole. Any dark texta will do. Even a biro.
  2. Don’t make the hole too close to the bottom, as I think you want to leave room for the the inevitable muck that builds up in the bottom.

At this point you should have a clear working area around you: make sure you feel comfortable by knowing in the back of you mind that there is nothing to trip over. A clear work area makes it a big difference to your stamina, and the job is more relaxing as you are more focused on the work.


Why we overlook safety, and why we should not

October 13, 2007

img_5175.JPGLet’s face it. There is a joy of working outside with one’s hands, and often, safety equipment feels like it is getting in the way of the experience. Either because we have to stop the work and go and find a pair of gloves (and you can bet the second hand, usually the right-hand glove in may case, will be missing) or go and find a pair of safety glasses. Or it is just feels a plain hassle to stop the job and organise what feels like extra gear outside the job. Big mistake and not smart thinking.

Safety is part of work, as sentient beings we need to respect our own welfare, look after ourselves. So we need in our planning stage to look at the risks and hazards we’ll be exposed to. (Which reminds I recently bought a pair of ladder legs to give extra stability for a long ladder I have, and this is one of the best tools I own.)

This minor injury in the picture could have been a lot worse: I was smoothing off the rough edges of the hole I had just cut. Thinking plastic is just plastic, harmless sort of. I never thought what I was doing really had the power to cut. I should also have been wearing safety glasses when cutting the holes. The unexpected is when accidents happen. We get too confident.


How much time does it take?

October 13, 2007

Preparing materials, gathering tools and cleanup. Includes cutting into downpipes. Roughly four hours.

The second wheelibin took about one-two hours because I had already worked through all the complications and tested options or built the special tools. The second time round felt like a breeze.


The tools

October 13, 2007

What tools did I use?

Power drill to cut the holes for the outlet in the bottom side of the wheeliebin, and for the rivet holes

Jigsaw to cut the hole in the top

Rivet gun to fasten the flywire to the lid

Round rasp to get the outlet hole size right

Tin snips or even an old pair pair of scissors can cut the metal flywire

Hacksaw to cut into the metal downpipe to fit the diverter

Multigrips to tighten the outlet fittings

Piece of wire  to feed the fitting through the bin from the inside to the outside

I should have worn safety glasses, and I should have worn gloves as you will soon see.

Tip: Smart way to use scissors: hold the top edge of the scissors to the surface while cutting and cut so the bottom
blade does all the work, this makes it much easier to cut in a straight line. 🙂


The equipment I bought to create the water collector

October 11, 2007

img_5173.JPGWe bought:

  • two wheelie bins. I bought these online from Wheelie Bin Sales for about $80 each and about $15 delivery (figure accurate as of today) . Very reasonable, (note: the small asterisk next to their prices means ex-GST, that is, GST is not included)
  • the plastic hose connections that fit in the bottom: not sure but these were less than $10 a set
  • about 600 mm X 1 metre wide quality fly-wire (that is, thick, metal and durable) about $10 or less (I used this to filter out debris as the water enters the wheeliebin
  • submersible pump (I can recommend the Creative Pump people in SA and their easy to use website with excellent comparison charts for pump features. Good follow-up service too.) This small pond pump (I now realise is underpowered for the slope it has to pump up) was about $50 with $9 delivery to Melbourne
  • a downpipe diverter to direct the water into the top of the wheelie bin, $30.

Tips: Before you buy, try to visualise and draw what you need. You might be able to save yourself a drive to the hardware. Like light globes, I find hose fittings confusing to buy and have returned home with the wrong ones more than once. The stores often keep the plumbing and garden fittings in separate areas. You may need to look in both.


Collecting rainwater from downpipes with a wheeliebin

October 10, 2007

img_5193-1.JPGHere’s the finished product. (Click for full-sized view.) We’ll walk through each step of the way. But before we start we need to get some preliminaries out of the way.

  • Plan: how I decided to do it the way I did. You might need a plan too
  • Equipment: what I had to buy, and where we bought it
  • Tools : the tools I used and the ones I improvised
  • Time: how long it took the first time
  • Safety: where it can go wrong (and did)

The plan

I wanted to:

  • collect rainwater and avoid the expense of a tank
  • position the wheeliebins under two separate roofs, one for the house and one for the shed
  • buy something I might be able to move if I had to, or use for another purpose
  • reduce the risks of mistakes as I am new to the water collecting game (even my forefathers, the German farmers on the peat marshes North Sea probably did not have to think a lot about droughts etc, but that’s another story)
  • avoid the expense of waving the householder’s magic wand at a plumber: its often more fun and satisfying anyhow to do it yourself
  • work out some way to get water uphill — we live on a steep slope

Looking back, I believe the plan was mostly good, and time well spent. I now have two of these 240L collectors set up. One with a submersible pump. But, I have to confess something here and now. Yesterday I fitted the tap to a new 1700 litre tank. That tells you that a wheelie bin is limited in one important way: what it can hold (mine are 240L). I’ll be honest, the planning phase was hampered by a lack of financial willpower, and a feeling I could do it on the cheap. Some just call it being tight. I prefer to call it thrifty, thank you!  I guess I was also over-optimistic: I did not realise that 240L is not a lot of water.